Trust you wont shoot me for posting that blue oval here ...
The electrickery journey continues -
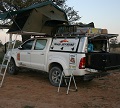
How do you get from this –
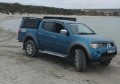
To THIS –
- 2.jpg (49.92 KiB) Viewed 6998 times
In TEN DAYS ……


Waar sien jy dit?ThysdJ wrote:Great stuff Chris..

Thys ek sien ook die nota op hul blad - wonder of dit net n web-fout is ...ThysdJ wrote:Great stuff Chris..
dalk kort hulle n nuwe webmaster .... ken jy dalk iemand ?ThysdJ wrote:Dis 'n baie nice panel en doen alles en baie meer as wat mens verwag. Dis hoekom ek verbaas is daaroor... Miskien is dit net 'n fout, of dalk het die demand bietjie die supply ge-overtake? Veral nou met die beurtkragte en so aan...
dankie Pieter.pietpetoors wrote:WOW, great job Chris
ThysdJ wrote:OOOOOO so die fout le by Chris??
sorry oubaas. die mechanic hy is bieter mittie tools assie comper ...ThysdJ wrote:OOOOOO so die fout le by Chris??