|
|

|
|
Overhauling a SFA Hilux Front Axle - Simon MorrisWater
and mud cause many problems when you drive your 4x4 through these
conditions, yes we like to show off in front of our buddies and
enjoy the mud flying all over the place, like to spray our 4x4 vehicle's
with mud so that when we drive home, other people will be able to
see that this guy is a real 4x4 Enthusiast BUT......... This
is my story For the last few months, yes it has already been a while now, (but I do not drive my 4x4 everyday, it stands in the garage at home and then I sometimes use it on the weekend) I have been smelling this burnt oil smell, had a look in the engine bay a few times to see if I could see any oil leaking from the engine and underneath the vehicle to see if any oil was leaking onto the exhaust pipe, thinking along the lines that maybe the engine was getting on in it's age, yes it does smoke slightly but not enough to warrant a burnt oil smell like this, however........... The other day on the way home from out 4x4ing, I noticed that the brakes were not too great, yes I do know that the front brake pads are getting low, but were still within their wear limit, I know that the one front wheel nut was broken and was going to tackle it the next time that I changed the swivel hub seals, because you have to remove the bearing hub and disc to replace the wheel studs. Well when I got home, I noticed that there was excessive smoke pouring out from the right front wheel arch, thought to myself OH @#$#$@ Anyway
popped the bonnet and saw that there was no oil leaking or much
smoke in that area, I then felt the front locking hub for warmth,
it did not feel too hot, but this is when I noticed that there was
smoke pouring out from the front brake caliper area, with the help
of a lead light, I saw that the outer brake disc backing plate and
the brake disc had some black looking grease on it, thus Bingo here
was the problem, now I can change the broken front wheel nut at
the same time
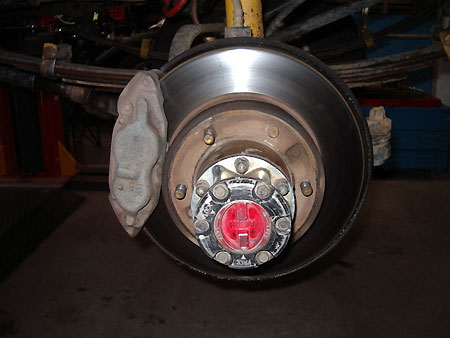
This photo above shows just how much grease was leaking onto the hot brake disc and thus the smoke oily smell. Thus once we
had cleaned up the shambles in the garage at Ronny's home, Yeah
we all collect junk We drove the Hilux onto the four leg two post single phase lift, the battery was then disconnected, the vehicle was then lifted off the ground once we had made sure that the legs were in their correct positions. We
did not lift it too high, but just high enough to be able to sit
on a small stool and work on the front axle, got to make
some changes due to ill health, some of us 40 old plus guys also
have problems with our chassis and frame work, our parts are also
wearing out Anyway both of the front wheels were removed and put away in a safe place. Out came the assortment of trays, and small bins that we put the various parts that we strip off so that we keep everything separate, just makes the assembly more easier. This first photo shows you the basic outlay of the hub section of the axle, if you magnify the photo you will see the grease oil at the bottom of the brake disc
This photo above once again shows you the grease oil also found at the front brake pads. Now step by step basically using some photo's I will explain to you the basic way that I went about stripping the right front section of the axle, the left side is very similar, however the side shaft is longer on the left side of the axle, because the pumpkin (centre part of the diff is not central, it is to the right side of the vehicle). Get some nice clean cloths nearby, then use a 10mm socket and ratchet and loosen the locking hub bolts, use a copper hammer and tap the locking hub end cover off, you will see a lot of MS or CV joint grease, just wipe the excess off and then use another cloth and wrap the locking hub in the cloth, place in a tray to one side, put the little bolts in the same tray as well, looking into the cavity where the hub went up against you will see lots of fowl looking black or gray grease, once again get your dirty rag and wipe away all that you can, you will then see the end of the side shaft towards you, you will then see a C - Clip Use a pair of C- Clip pliers and open this clip and remove it, for safety wear a pair of protective glasses when you do this, sometimes the clip goes flying across the floor, once you have managed to remove the clip, dump it in a separate container to be washed. Then
loosen off the bolts that hold the main free wheel hub body to the
bearing hub, once the nuts have been removed, you will then see
some spring washes, remove them as well and then you will see some
nice looking cone washed, the easiest way to remove these cone washes
is once again to use a copper hammer and tap the outer section lip
of the housing, but be careful that the cone washes do not shoot
out and hit you in the
Okay so you have managed to remove all the cone washes, now remove the free wheel hub body, also place it in a cloth rag and place to one side. Once
you have removed the free wheel hub body, also wrap it in a piece
of clean rag and place it to one side. Now you will see the first
nut, then a locking washer, then another nut then a thicker spacer
washer, to be able to remove the first nut, you have to look for
the place on the flat of the nut and with using a flat chisel, unlock
the tab, instead of stuffing up the nut using a hammer and a flat
chisel to loosen the nut, we have got this excellent idea instead
Yeah take a drive down to the local plumbing business and buy a socket that is used to remove geyser elements, this socket is the same size as the nuts on the front axle, but you will have to modify it slightly when you refit the bearings and to torque them to the correct torque, I will explain this to you later |
| |
|