|
|

|
|
Replace
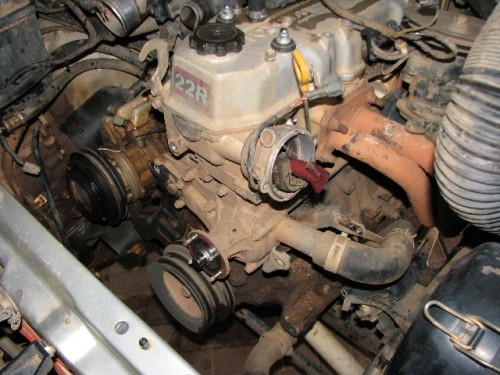
Timing Chain and Tensioner for 22R Toyota Hilux 2.4 -
|
||||||||||||||||||||||||||||||||||||||||||

| Item | (Toyota Part Number) | Price Excl (4 Apr 2009) |
| Timing Chain - | 1350635030VP | R 141.55 |
| Timing Cover Gasket | 1132835030 | R 87.80 |
| Timing Cover Gasket | 1132935030 | R 67.32 |
| Crankshaft Sprocket | 1352175010 | R 359.66 |
| Camshaft Sprocket | 1352335020 | R366.52 |
| Tensioner | 1354035011 | R 574.96 |
| Damper | 1356135020 | R 223.95 |
| Damper | 1356235020 | R 155.52 |
| Oil Seal | 9031145011VP | R 89.00 |
| 6L Toyota Coolant | 0888980089 | R 36.59 X 6 |
| Rocker Cover Seal | (Did not know I was going to need one so ended up buying one at Autozone today) | |
| 5L Engine Oil | ||
| Castrol Red Rubber Grease | R 163 | |
- Disconnect the battery terminals.
- Working under the vehicle loosen and remove the stone guard from the vehicle.
- Drain and remove radiator.
- Loosen the drive belt pulley locknut and turn the adjusting bolt anticlockwise, until the drive belt can be removed and withdraw the belt from the vehicle.
- Loosen the air conditioner adjusting bracket and remove.
- Also remove the AC drive belt

Loosen the alternator
drive belt adjusting and pivot bolts and remove the drive belt
Loosen the distributor cap and place clear of the work area
Make a mark on the engine and the dizzy where they meet so as to
be able to align afterwards.
Using a socket and bar, turn the engine clockwise, until the mark on the crankshaft pulley aligns with the 0 mark on the timing cover and the rotor arm in the distributor is pointing to the no. 1 cylinder segment in the distributor cap. Mark the position of the rotor arm on the distributor housing.
Loosen the
distributor retaining screw and remove the distributor from the
engine.
Loosen the bolts retaining the power steering pump and place the
pump to one side clear of the working area ( DO NOT DISCONNECT THE
HOSES)
Remove the
bolts retaining the belt pulley bracket and remove the bracket
Unbolt and remove the power steering pump upper and lower brackets
Disconnect the wires from the alternator. Remove the remaining bolt
holding the alternator in place and remove the alternator

Remove the 4 nuts retaining the fan and coupling assembly and remove the fan and pulley. At this stage I put the dizzy back to make sure that all is still aligned
Remove the pipes and anything connected to the rocker cover. Remove the nuts and rubber seals retaining the rocker cover and remove the cover.

Lock the engine in place and loosen the bolt keeping the crankshaft pulley in place. There is various methods of locking the engine in place. I took a strong piece of cotton rope and wound it around the pulley on one side and around the hook, bolted to the engine block for hoisting the engine out of the engine bay, on the other side. If you have a assistant, you can remove the starter motor and use a lever through the starter motor mounting aperture and lock the engine at the ring gear teeth.
Ensure that the timing mark on the crankshaft pulley remains aligned with the 0 mark on the timing cover and the rotor arm in the distributor is still pointing to the No 1 segment in the distributor cap.
Use two large screwdrivers to lever the crankshaft pulley from the crankshaft

Remove the distributor
again.
If you have a mechanical fuel pump (mine don't - EFI) mark the hoses
and remove the pump from the engine
Insert a suitable lever through the camshaft sprocket to prevent it from turning. Remove the bolt retaining the distributor drive gear and fuel pump cam. Withdraw the drive gear and the cam from the camshaft.
Remove the bolt retaining the cylinder head to the timing cover

Remove the alternator
support bracket and bolts
Remove the bolts retaining the metal heater pipe to the timing cover
on the left hand side of the engine

Remove the timing cover retaining bolt from below the heater pipe

Remove the sump plug and drain the sump of all the oil. After the sump has drained replace the sump plug.
Remove bolts retaining sump and remove sump from engine. Take care not to damage the surface where the sump and engine meet.

Remove the remaining bolts keeping the air conditioner compressor in place and put the compressor to one side away from the working area.
Loosen the bolts retaining the A/C compressor bracket and remove the bracket.

Using a soft faced hammer, gently tap the timing cover to break the adhesion of the gaskets. Manoeuvre the timing cover from the engine.
Note the installation position (shoulder and teeth) of the oil pump drive sleeve and remove it from the crankshaft

Remove bolts
retaining the chain tensioner and remove the tensioner
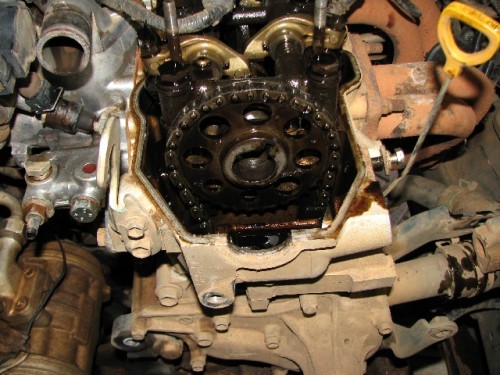
Carefully prise the sprocket from the camshaft.
Disengage the chain from the camshaft sprocket and carefully lower the chain and remove the chain from the engine.
Noting the
installation position remove the crankshaft sprocket from the engine.
Remove the bolts retaining the timing chain guides and withdraw
the guides from the engine.

Place the timing cover on a soft surface and remove the oil seal from the oil pump cover and replace with new seal. Use liberal amounts of red rubber grease to grease the contact surface where the seal and crankshaft meet.

Note the old seal next to the rubber grease. An easy way to remove the old seal is to drill a small hole in the seal and screw in a self tapping screw and then extract using pliers.

The installation is the reversal of the removal process. There is a few things to note though.
Renew all seals and gaskets and make sure joining surfaces is clean of previous gaskets etc.
Install the new guides and crankshaft sprocket. Insert the timing chain and the camshaft sprocket noting to match the bright links on the chain to the marks on the sprockets.

Use gasket sealant to add to the points where the timing cover, engine block and cylinder head meet. (see following photo)

Like I said previously I'm not sure at what mileage one is supposed to change the chain. I compared the old chain with the new chain and if I hanged then side by side the older chain was about 2mm longer. Then there was the tensioner. Below is a comparative photo of old versus new
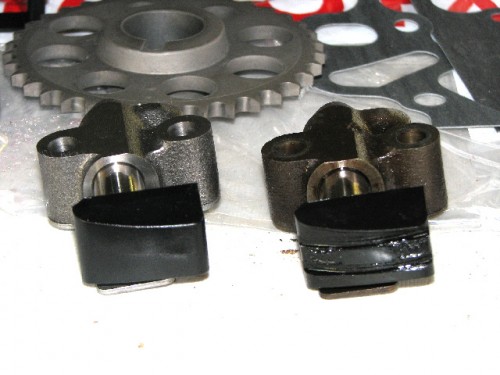
The rest of the guides and sprockets still looked in good nick.
The whole job took me about two days (with interruptions) and this is how you look like after day 1


And last but not least, my assistant, quality inspector and advisor..