|
|
|
|
1999 Hilux Headlight ConversionIt is a pain when you forget your Hilux's head lights on and find the battery completely drained when you return. I first modified our Tazz so that the head lights only come on when the ignition is switched on. Now I did the same with my Hilux. I did this on my 1999 Hilux 2.7 Petrol. First you have to locate the fuse box in the engine compartment. When you open the bonnet and look at the engine, it will be that black box on the right just behind the battery. When you open it, you will see some fuses and relays. You have to loosen the fuse box by removing the three bolts as shown below, it takes a 10 spanner. You also have to remove the battery since it is very difficult to turn the fuse box upside down with the battery in position. You do not really have to open the fuse box to do the conversion, but it is good to know what is inside. The red relay is the one which switches the lights on and off. When you switch the head lights on you will hear something click in the engine compartment, that clicking sound comes from this relay. This relay has permanent power on it. So whether the vehicle is switched on or not, the head lights will go on when you switch the lights on. We want to change that. We want the relay to only have power when the vehicle is switched on. Once you removed the battery and loosened the fuse box, turn the fuse box around and remove the cover on the back
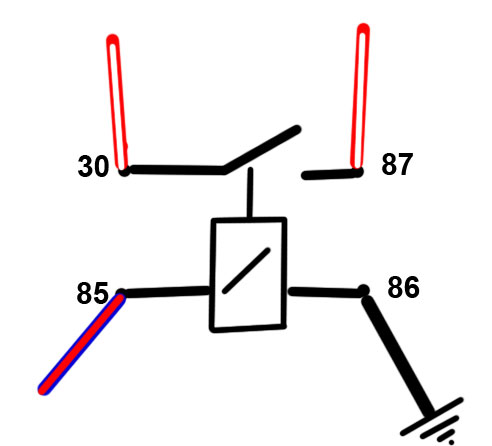
Now look at the wires at the back. At the top right you will note one thin wire (white/red) and just above it a thick Red/Blue wire. You have to cut the white/red wire (which goes to the head light relay). We will only skin the Red/Blue wire to tap into it. The Red/Blue wire only has power when the vehicle is switched on and the white/red wire powers the headlight relay. I added an addition relay to do the switching on and off work. The thick blue/red power wire only switches my extra relay on and off. The relay connects and disconnects the white/red wire. Thus the white/red wire will be "cut" when the ignition is off and connected when the ignition is on. If your vehicle's wiring has different colours, just look for any wire which will only have power when switched on and use that where I used the blue/red wire. Hope it makes sense. The diagram below shows a typical relay.
The thing between points 85 and 86 is the solenoid or electro magnet thingy of the relay. When you apply power to it, it will pull in and close the contact between points 30 and 87. So it works like a switch but it uses the solenoid to do the switching.. To let the relay work you need to add positive to any one of points 85 or 86 and an earth/negative wire to the other. If you look at the diagram below you will see how I connected it.
Remember the different wires I explained below pic 2. The earth wire at point 86 I sommer connected to the body just to the right of the fuse box I also replaced the park lights, number plate lights and interior dome light with LED's. So now we will not suffer a flat battery anymore. When you switch the ignition off (or on acc) then the head lights switches off and only the park lights remain on. |

.jpg)

