|
|

|
|
Fit VHF Radio and Antenna in IFS HiluxToday I had to install a VHF radio in my bakkie. I got the Kirisun PT800 from our radio specialist, Eric Skeen. Eric told me to put the antenna on the right hand C-pillar. For those who do not know, that is the column behind the rear door, that is the back part of the cab. I decided that the most logical way will be to install the antenna first. So I started to strip the inside of the bakkie to see where I will take the wire and where I must drill the hole for the antenna. To expose the area where you want to work you must remove the plastic cover on the inside of the C-pillar. In order to do that you first have to remove the top bracket of the seat belt. Then remove the trimming on the inside of the door sill.
In order to fit the antenna you have to drill a 19mm hole on the outside of the C-pillar. You can use a circular saw to do this. After I removed the plastic covers on the inside of the C-Pillar I saw that the pillar is covered from bottom to top. I though I would also have to drill a hole on the inside to get the cable through. From the beginning the 19mm hole bothered me. When I saw the inside of the pillar will need another hole I decided to chicken out and not drill any holes. Afterwards Eric told me that the professional installers use something similar to the fish tape which electricians use to get the wire through the C-pillar without drilling a hole on the inside. Anyway, I could not get it over my heart to drill a 19mm hole in the C-pillar. I decided to rather install the antenna on the canopy. Since I have a Aluminium canopy I could fit it to the canopy. Apparently a fibreglass canopy won't work.
I used the 20mm circular saw and manufactured a 3mm
aluminium bracket for the antenna.
I fitted it to the canopy with two 5mm self tapping screws.
Then inserted the antenna as instructed on the accompanied instructions.
Note the slot. At first I just had a hole in. I then realised that when I take the canopy off I will not be able to remove the antenna. The idea is to fit a similar bracket on the roll bar and when I take the canopy off I will just fit the antenna on the roll bar. I cut the slot to enable me to remove the antenna without removing the bracket.
Below is a picture of the final position of the antenna. Note that it is still in the area of the C-Pillar. It is even a bit higher that what it would have been if I fitted it to the C-pillar.
The only hole I had to drill was a 6mm hole through
the cab to take the wire out to the back. I always paint the area
where I drilled with some metal primer to prevent rust. The antenna wire is 5mm thick. I drilled a 6mm hole and sealed it with silicon so that the wire can still move and not be too tight. Remember to also leave enough slack on the outside to compensate for the movement of the cab vs the load bin.
Now I had to run the wire to the front. I removed the panels on the floor.
You will see that there are a harness running there, under the carpet. I just run the antenna wire next to the harness.
At the front I first removed the foot rest. To do this just insert a screw driver behind it and pull it forward, the clips will release and the foot rest will come off.
I then took short cut to the centre panel by running the wire under the carpet. All you do is take the cable in one hand, then force your hand under the carpet un till it reach the other end. That way you do not have to remove the whole carpet. (Apologies, the bakkie is not always this dirty, I've been to Wupperthal the day before I did the installation)
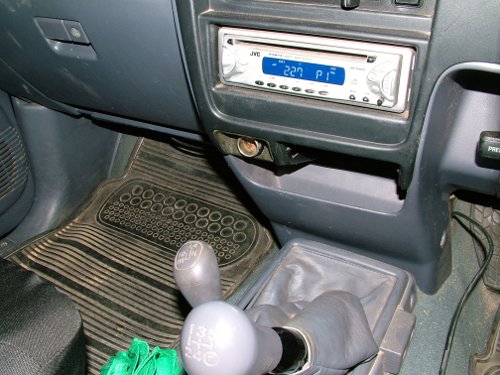
I decided to put the radio in the centre console under the radio. When I got my bakkie two years ago the ash tray's bracket was broker and it rattled. So I just removed the whole thing with bracket. The only thing I use the ash tray for is to hide the chocolate wrappers when I went to the shops. So I do not really need an ash tray. TIP: If you own a IFS and do not use the ash tray, if you remove the whole thing the tray underneath the ash tray becomes much more useful. It is ideal to put your wallet and cell phone as it is not easily visible from outside. I test the size of the gap and found that this radio will fit tightly in the gap under the ash tray (with ash tray removed).
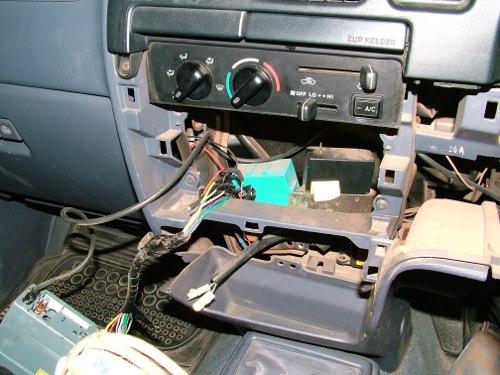
To get to that panel is a bit of a mission. You first have to remove the panel under the steering wheel. There are two screws on the hand brake side, on the other side is one screw at the top and then a bolt that takes a 10mm socket next to the door. After you removed that cover you must remove the black cover around the radio. This one has only one screw in the middle if the tray under the ash tray. After you removed that screw you can just pull the black cover forward carefully. It has clips in the areas I marked with red dots in the picture below.
With all of those removed you can now remove the bottom tray.
You have to cut a hole in the back of the tray for the antenna plug. In the picture below you will see that I cut two holes. I always wanted to fit an extra power plug in the cab which is permanently connected to the battery. So while I striped everything and had to connect the radio to the battery I thought it was a good idea to fit the extra plug at the same time. That is what the hole in the front of the tray is for. This did not work as well as I thought it would as it was in the way of the radio. In the end I had to move the extra plug as far down as I could and I also had to cut the rear hole bigger for the plug as indicated in the picture below.
The radio must be connected directly to the battery. On the IFS 1999-2005 models there is a rubber plug in the engine compartment on the battery side (indicated below). If you stick the wire through this plug it will enter the cab just behind the cubby hole. Ideal for running a wire into the cab. The radio's standard plug is too big to fit through the hole and I did not want to cut the rubber. So I cut the power cable, stuck it through the hole and then soldered the wire back together afterwards.
The Antenna came without a plug on the wire. So I had to put on a new plug which was supplied with the radio. To do this strip the wire as indicated below. Then stick the wire into the back of the plug and the solder the point onto the tip of the plug.
Afterwards, use a Multimeter (Digital or Analog) to check the following:
Now you can refit all the tupperware. Note that the wires are sticking out in front.
Now connect the radio and force into the gap behind the radio. In my case with the radio I have it fits tight and I did not have to secure it with a bracket. Eric said that it does not get too hot and should not melt the plastic. What I like about this installation is that I can easily remove the radio when I do not use it. You will see the radio and the extra plug in the picture below. Because I had to move the plug down from the original hole I made I had to add the checkered plate to cover the hole. I will eventually look for a replacement tray at a scrap yard. The reason I did not fit the radio deeper is because there are metal brackets and controller boxes behind that lower tray. So you cannot stick it in much deeper than this.
|